Showing posts with label circle punches. Show all posts

Tuesday, April 19, 2016

Always Thinking of You!

Hi Everyone! We FINALLY have beautiful weather here! I am just itching to get to my gardens~ How about you??


I have to tell you a little story...

So, the other day I sat down at my desk all ready to work on a card. 

Guess what!?? 

My Stampin' Up! Paper Trimmer was missing! The world is coming to an end!

I couldn't find it any where. 

Of course panic is setting in... then I remember I was over at a friends house Friday night using it. 

I ask her if she has seen it. Nope, she never found an extra one. 

Really starting to panic now, you know heart palpation's, shortness of breath and everything! I ask her to please check again!

Guess what!? Yep, she had it! All smiles and sunshine now!


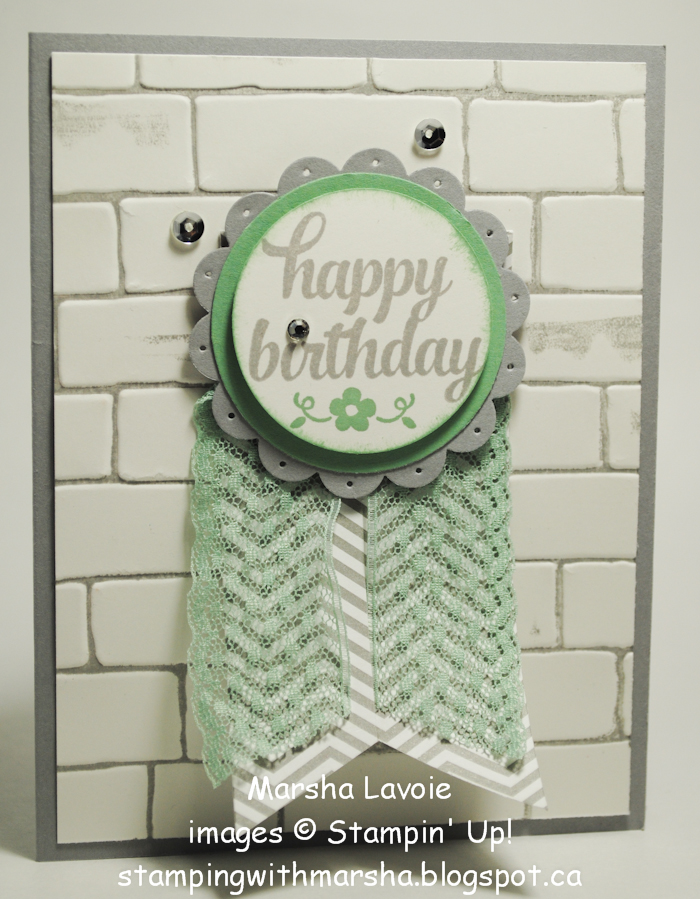
Here is my card for you today. I saw this sketch on Pinterest and knew I had to recreate it. 

thinking of you

This is one of those sketches that is perfect for using up small pieces of DSP, that we all have!

thinking of you

I did not use any Dimensionals on the circles, because I wanted the banner to be the main focus.

You could always change the circles to balloons! Oh, I might try that. Keep checking back! 

Supplies:

Paper:
Whisper White
Crumb Cake
Love Blossoms DSP

Inks:
Memento Black

Stamps:
Express Yourself (retired)

Accessories:
1 1/4" Circle Punch
1" Circle Punch
1/2" Circle Punch
Itty Bitty Accent Punch (retired)
Glue Dots
Dimensionals


Thanks for stopping by, if you have any questions let me know!

Happy Stamping!
Marsha 

Don't forget to use the hostess code at the top on the right when you are ordering. If your order is $200 or more please do not use the code, as you become the hostess.

If you liked any of the supplies, to shop, or to get a catalog, please feel free to contact me, and of course you can shop online for Stampin’ Up! Canada products directly through me by clicking the ‘shopping cart' button on the right. And if you’re thinking of joining Stampin’ Up! Canada and want to join my team I’d would love to hear from you!


Friday, April 8, 2016

International Blog Highlight

Hi Everyone! I am so excited! Today I am participating in Kylie Bertucci's International Stampin' Up! Blog Highlight. 

Crafters from all over the world are joining together to share with you their awesome creations! Link is below for you to travel around the world!

The Theme is Love! It can be any type of love - baby, wedding, anniversary, romance, friend, animal...
Best Day Ever, romance, love, anniversary

The colours are: Early Espresso, Whisper White and Pool Party

the best day ever, wedding, anniversary

Don't you just love the Itty Bitty Accent Punches!

Here is the link if you want to check out the others that have participated and vote for your favorite!

Supplies:

Paper:
Early Espresso
Whisper White
Pool Party

Inks:
Early Espresso

Stamps:
Birthday Blossoms

Accessories:
Happy Heart Embossing Folder
2 3/8" Scallop Punch
2" Circle Punch
1 3/4" Circle Punch
Glitter Ribbon (Pool Party)
Itty Bitty Accent Punches
Rhinestones
Glue Dots
Dimensionals

Don't forget to check out the other crafters and vote for your favorite!


Thanks for stopping by, if you have any questions let me know!

Happy Stamping!
Marsha 

Don't forget to use the hostess code at the top on the right when you are ordering. If your order is $200 or more please do not use the code, as you become the hostess.


If you liked any of the supplies, to shop, or to get a catalog, please feel free to contact me, and of course you can shop online for Stampin’ Up! Canada products directly through me by clicking the ‘shopping cart' button on the right. And if you’re thinking of joining Stampin’ Up! Canada and want to join my team I’d would love to hear from you!

Friday, February 26, 2016

A cheery Thank you card

Hi Everyone! Today's card is a bright and cheery thank you card, using the Apple of My Eye stamp set. Who knew that you could  make a really cute thank you card out of fruit!

This is my February Thank You card to my customers. I love sending them out!


thank you stampin up


Did you know that the 1 3/4" circle punch works wonderfully with the fruit! No cutting! (You do have to cut out the pear and the apple).

What have you made so far with this Apple of My Eye set?

Supplies:

Paper:
5 1/2" x 8 1/2" cardstock
5 1/4" x 4" cardstock
5" x 3 3/4" cardstock

You will need extra Whisper White for the fruit and some Rich Razzleberry that goes behind the greeting. 

Here are the supplies I used:
Built for Free Using: My Stampin Blog


Thanks for stopping by, if you have any questions let me know!

Happy Stamping!
Marsha 

Don't forget to use the hostess code at the top on the right when you are ordering. If your order is $200 or more please do not use the code, as you become the hostess.

If you liked any of the supplies, to shop, or to get a catalog, please feel free to contact me, and of course you can shop online for Stampin’ Up! Canada products directly through me by clicking the ‘shopping cart' button on the right. And if you’re thinking of joining Stampin’ Up! Canada and want to join my team I’d would love to hear from you!


Friday, February 19, 2016

So Sorry...

Hi Everyone! Unfortunately, every once in a while we need to make/give/receive Sympathy cards. We all hate to make them, but I would rather give one that I have made than a store bought one. I think it's more personal.
happy birthday

This is another Mojo Monday sketch #429.

Supplies:

Paper: Basic Grey 11" x 4 1/4"
Bermuda Bay 4" x 5 1/4"
Whisper White 3 3/4" x 5"
DSP Have a Cuppa 3" x 4"
extra Basic Grey and Whisper White

Stamps: So Sorry (retired)


Built for Free Using: My Stampin Blog


Thanks for stopping by, if you have any questions let me know!

Happy Stamping!
Marsha 

Don't forget to use the hostess code at the top on the right when you are ordering. If your order is $200 or more please do not use the code, as you become the hostess.

If you liked any of the supplies, to shop, or to get a catalog, please feel free to contact me, and of course you can shop online for Stampin’ Up! Canada products directly through me by clicking the ‘shopping cart' button on the right. And if you’re thinking of joining Stampin’ Up! Canada and want to join my team I’d would love to hear from you!

Wednesday, February 17, 2016

Bright and Cheery Thank you!

Hi Everyone! Today's card is a bright and cherry Thank You card.


thank you card

This is another great set Apple of My Eye, from the Occasions Catalog. I can't wait to create more with it.

I stamped the leaves on an extra piece of Whisper White cardstock, then I fussy cut them out, it didn't take too long. Adhere them to my fruit, which I punched out using the 1 3/4" circle punch. Of course they are popped up using Dimensionals!

Supplies:

Paper: 
Baked Brown Sugar 11" x 4 1/4"
Old Olive 4 1/2" x 3 1/4"
Whisper White 4 1/4" x 3"
extra Whisper White
Built for Free Using: My Stampin Blog


Thanks for stopping by, if you have any questions let me know!

Happy Stamping!
Marsha 

Don't forget to use the hostess code at the top on the right when you are ordering. If your order is $200 or more please do not use the code, as you become the hostess.

If you liked any of the supplies, to shop, or to get a catalog, please feel free to contact me, and of course you can shop online for Stampin’ Up! Canada products directly through me by clicking the ‘shopping cart' button on the right. And if you’re thinking of joining Stampin’ Up! Canada and want to join my team I’d would love to hear from you!


Tuesday, February 16, 2016

No Waste Card!

Hi Everyone! Today's card is one that we made at my Stamp Club meeting in January. Finally getting the chance to share it with all of you now!


you are tea-riffic

As not to waste any paper, I cut my first piece of DSP to 3 3/4 x 5", with the remaining piece I just turned it over to use for the 1 3/4 x 5" panel. Of course it all matches beautifully! Love it and no waste! Happy Girl!

Supplies:

Paper: 
8 1/2" x 5 1/2" Whisper White 
4" x 5 1/4" Bermuda Bay 
3 3/4" x 5" DSP Have a Cuppa
1 3/4" x 5" DSP Have a Cuppa 
3 1/4" x 3 1/4" Melon Mambo  
3" x 3" Whisper White 

Here are the supplies I used:
Built for Free Using: My Stampin Blog


Thanks for stopping by, if you have any questions let me know!

Happy Stamping!
Marsha 

Don't forget to use the hostess code at the top on the right when you are ordering. If your order is $200 or more please do not use the code, as you become the hostess.

If you liked any of the supplies, to shop, or to get a catalog, please feel free to contact me, and of course you can shop online for Stampin’ Up! Canada products directly through me by clicking the ‘shopping cart' button on the right. And if you’re thinking of joining Stampin’ Up! Canada and want to join my team I’d would love to hear from you!


Friday, February 12, 2016

Index Card Notebook

Hi Everyone! I have a fun little project to share with you today! Just in time for Valentine's Day! 

My daughter wanted something to give her BFF for Valentine's Day. Since we don't do treats (allergies), we do stationery stuff (actually she had a list of stationery stuff to give her!), cause you know I am a Stampin' Up! Demonstrator and all! lol. 

This is what I came up with!

An Index Card Notebook!


index card holder

You can put as many index cards as you would like, and when those are all filled up, you can empty it and refill it with more or continue to add more! That is the beauty of this project, it never ends!

Supplies:

Paper: 
3 x 5" Whisper White Thick Card stock
2 3/4 x 4 3/4" cardstock
2 1/2 x 4 1/2" DSP

Accessories:
3 x 5" Index Cards
Binder Rings (various size)
Crop-a-dile (to punch through many layers of paper, if not just a single whole punch will do)

A tutorial on how I made it!


Here are the products that I used.


Built for Free Using: My Stampin Blog


Thanks for stopping by, if you have any questions let me know!

Happy Stamping!
Marsha 

Don't forget to use the hostess code at the top on the right when you are ordering. If your order is $200 or more please do not use the code, as you become the hostess.

If you liked any of the supplies, to shop, or to get a catalog, please feel free to contact me, and of course you can shop online for Stampin’ Up! Canada products directly through me by clicking the ‘shopping cart' button on the right. And if you’re thinking of joining Stampin’ Up! Canada and want to join my team I’d would love to hear from you!

Thursday, February 11, 2016

Hello Baby!

Hi Everyone! Today's card is all about babies! 


welcome baby

I haven't made a baby card in forever! Look at those toes! Seriously cute!


baby card

I used one of Julie Davison's card sketches. I know the feet are not a Stampin' Up! stamp. We used to have one very simular to this. I wish Stampin' Up! would bring it back.

Supplies:

Paper: 
Crumb Cake 11" x 4 1/4"
Blushing Bride or Old Olive 3 1/2" x 4 3/4"
Whisper White 3 1/4" x 4 1/2"
DSP (2) 1/2" x 3 1/4"
Built for Free Using: My Stampin Blog


Thanks for stopping by, if you have any questions let me know!

Happy Stamping!
Marsha 

Don't forget to use the hostess code at the top on the right when you are ordering. If your order is $200 or more please do not use the code, as you become the hostess.

If you liked any of the supplies, to shop, or to get a catalog, please feel free to contact me, and of course you can shop online for Stampin’ Up! Canada products directly through me by clicking the ‘shopping cart' button on the right. And if you’re thinking of joining Stampin’ Up! Canada and want to join my team I’d would love to hear from you!

Monday, November 16, 2015

Designer Series Paper Challenge (for me)!

Hi Everyone! How was your weekend? Sunday was the best weather day here. The sun was shinning and it was kind of warm (for November, in Canada that is)!

I am continuing to challenge myself using more Designer Series Paper (DSP) on my cards. I have been searching Pinterest for sketches. I have found a few that I like, so over the next couple of days you will get to see the end results of them.

Here is the sketch I used for today's card.

Pennant pattern from mojo monday that i used  for serenity cards.

These are my cards, what do you think?

circle of spring
circle of spring
This time I made 2 of the same sketch, I just changed the colour of the banner and the buttons. 

Not sure which one I like better, it is certainly completely out of my comfort zone!

circle of spring

I think I am leaning towards the Calypso Coral one more. Which one do you like more?

Supplies:

Ink: Crushed Curry

Paper: Sahara Sand, Calypso Coral, Coastal Cabana, Whisper White, Best Year Ever DSP (retired)

Stamps: Circle of Spring

Accessories: Triple Banner Punch, 1 3/8 Circle Punch, 1 1/4 Circle Punch, Buttons, Glue Dots, Dimensionals, Bakers Twine


Thanks for stopping by, if you have any questions let me know!

Happy Stamping!
Marsha 

Don't forget to use the hostess code at the top on the right when you are ordering. If your order is $200 or more please do not use the code, as you become the hostess.

If you liked any of the supplies, to shop, or to get a catalog, please feel free to contact me, and of course you can shop online for Stampin’ Up! Canada products directly through me by clicking the ‘shopping cart' button on the right. And if you’re thinking of joining Stampin’ Up! Canada and want to join my team I’d would love to hear from you!


Saturday, November 14, 2015

Birthday Blossoms and Painted Petals

Hi Everyone! I have been working on this card for a couple of days. It is very much out of my comfort zone!

I am not one who stamps an image multiple times for a back ground, I usually find it to be too busy. 

painted petals

It took me days because I couldn't figure out what sentiment and how I wanted it. At first I was thinking of some sort of banner. Glad I picked the Scallop and Circle Punches.


Supplies:

Paper: Very Vanilla, Watercolour Paper, Old Olive, Island Indigo

Inks: Memento Black, Old Olive, Island Indigo

Stamps: Birthday Blossoms, Painted Petals

Accessories: Pearls, Dimensionals, 1 3/4 Scallop Punch, 1 1/2 Circle Punch, 1 3/8 Circle Punch, Aqua Painter


Thanks for stopping by, if you have any questions let me know!

Happy Stamping!
Marsha 

Don't forget to use the hostess code at the top on the right when you are ordering. If your order is $200 or more please do not use the code, as you become the hostess.

If you liked any of the supplies, to shop, or to get a catalog, please feel free to contact me, and of course you can shop online for Stampin’ Up! Canada products directly through me by clicking the ‘shopping cart' button on the right. And if you’re thinking of joining Stampin’ Up! Canada and want to join my team I’d would love to hear from you!

Monday, October 26, 2015

Inked Embossed Folders

Hi Everyone! Today's cards are all about the technique - Inked Embossed Folders. I have 3 different cards to share with you using this really cool technique. 

For this technique you ink up your brayer then run it over one side of your embossing folder. Usually the top side of the folder. Then you run it through your Big Shot (or whatever you use). When it comes out, the ink is transferred to the shallow part of your embossed piece. 


Same technique, yet 3 completely different cards! To take this even further you could always sponge the raised part of each image, to give it more detail. I did that on this card, this one and this one.

Which one is your favorite? I think I will have to go with the Woodland one. I absolutely love the Soft Sky in the back ground. I love how peaceful it is.


Thanks for stopping by, if you have any questions let me know!

Happy Stamping!
Marsha

If you liked any of the supplies, to shop, or to get a catalog, please feel free to contact me, and of course you can shop online for Stampin’ Up! Canada products directly through me by clicking the ‘shopping cart' button on the right. And if you’re thinking of joining Stampin’ Up! Canada and want to join my team I’d would love to hear from you!

Saturday, October 17, 2015

Christmas Advent Calendar

Hi Everyone! Today I have a project for you, a Christmas Advent Calendar!

I had a lot of fun designing and make it. I wanted something that wouldn't take up too much room, but would be able to hold small goodies for at least three people (my hubby likes chocolates too!), and that I had to use what I already had. I couldn't go out and buy new things. It also had to be from one sheet. I didn't want to glue a bunch of pieces together. Talk about a challenge at first! This is what I came up with. What do you think?

advent calendar stampin up

Supplies: Trim the Tree DSP (4 1/2 x 6 1/2), clothes pegs, elastic string, Quickcuts (for the numbers), crimper (for the bottom of the bags), circle punches, star thinlits from the Mini Treat Bag Thinlit, fast fuse, and a picture frame (29x21 Ikea). I love how it turned out!!!

advent calendar stampin up

They look like little chip bags! 

advent calendar stampin up

I made a video so you can make one too! If you do, I would love to see it!


The finished size of each little pouch is 3 x 5 1/2. Hope you like it!

Thanks for stopping by, if you have any questions let me know!

Happy Stamping!
Marsha

Don't forget to use the hostess code at the top on the right when you are ordering. Thanks for supporting Stamping with Marsha!

If you liked any of the supplies, to shop, or to get a catalog, please feel free to contact me, and of course you can shop online for Stampin’ Up! Canada products directly through me by clicking the ‘shopping cart' button on the right. And if you’re thinking of joining Stampin’ Up! Canada and want to join my team I’d would love to hear from you!